ASE 2 3DO
(c) P.A.Flack 2002-2003
About Download Using Advice Collision Volumes
About

ASE 2 3DO is a program for converting .ASE (ASCII Scene Export) files created by 3DStudioMax (or 123do) into .3DO files as used by Grand Prix Legends for 3D objects.  There are currently two versions available: one that is suitable for very large or complicated objects, and one that supports collision volumes.  123do comes with a collision-enabled version, so unless you are creating large/complicated objects you need not read any further :)

New since the first release (ase23do):


Download

Large objects / complicated objects   ase23do (83kb)

Collision-enabled objects   ase23doc2 (230kb)


You might also need to install some run-time libraries - just copy them into the same folder as ase23do.exe

Borland runtime dlls
(vcl50, borlndmm, dclusr50, cc3250mt)
(991kb)


Using

1)  Create your object using 3DSMax or 123do.  Make sure you have followed the Advice, then export a .ASE file (in 3DStudioMax - File -> Export (Selected) -> .ase.  Use the following settings:
tick - Mesh Definition
tick - Materials
tick - Mapping Coordinates
tick - Geometric
Decimals: 3 or 4 should be sufficient
Nothing else should be ticked.

Make sure you don't export an animated scene!  

2)  optional stage for ase23doc2 - edit your .ase file to include your Collision Volumes.

3a - ase23do)  Run the program.  Click the Pick ASE file...  button to load your .ase file.  Wait for the program to load the file.   Then click the  BSP & Save as 3do  button to process the object and save a .3do.

3b - ase23doc2)  At the Command Line (Start->Run->command), type   ase23doc2 myobject.ase myobject.3do.


Advice

Creating objects automatically for GPL is a complicated process.  ASE23DO takes your .ASE file, extracts information from it, creates a BSP tree of the whole object and then creates a .3DO file that hopefully matches the object that you designed!  There are many ways in which the process can go wrong, but if you follow the advice given here, it should all work happily.


Point of Origin
When designing your object, make sure that you place the point-of-origin (0,0,0) in a sensible place, otherwise when you add the .3do to GPL, it might not be quite where you expected...


Materials
When creating a material in 3DSMax, make sure you only attach an image to the 'Diffuse Map'.  And make sure that you DO attach an image.  ASE23DO only looks for images in that specific place, so if you don't have one there, or if you have multiple images (diffuse, opacity, bump,...), your .3do object may not be what you wanted.


Texture Mapping
Do not rely on various texture mapping options available in the Material dialog.  Use the UVW map modifier settings only.


Clipper
By using an image named clipper.bmp (.tga, .jpg, whatever) you can help the BSP-tree creation process and reduce the complexity of the .3do.  To use this, simply create a polygon in your scene that you wish to be used as a 'clipper', apply the material with clipper.bmp to it, and position that polygon appropriately:

Take this sphere..  
sphere1

If you exported it to .ase and created a .3do from it, ASE23DO has to try and create a BSP-tree from it.  The result is a tree where every single polygon follows every other polygon = very bad.   What we can see as humans, is that the sphere is structured in such a way that it can be divided into halves, then quarters, then eighths.  This is A Good Thing.

sphere2

(transparency is only so you can see what is going on)

Hopefully you can see how the largest clipper polygon divides the sphere into top and bottom, then two more divide it into quarters, then the smallest four divide those quarters in half.  This second sphere will have a 'depth' one-eighth that of the first sphere.  GPL will like this, and you will appreciate the frame-rate boost.

Obviously a sphere is an extreme example, but the same principle of dividing your object into pieces using clipper polygons is essential if you want optimized objects.

Here is a piece of terrain using clippers:

clipper
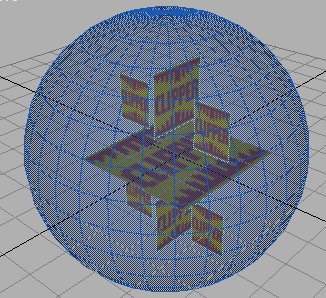
(on the left is the object in 3d, on the right is a top-down view showing where the clipper polygons divide the object)


Notice how the clipper planes cut at right angles to each other - ase23do will try and divide your object into pieces using the clippers in the best way possible, so this kind of object and clipper placement can be done without worry.  In this particular object, the horizontal clippers will be used first because they deal with a large proportion of the polygons without having to split any polygons.  Then the vertical clippers will be used to divide up the remainder.

You will get a feel for how the clippers work by noting the 'depth' and 'split polygons created' statistics in the ase23do window.  Both values should be kept as low as possible - Depth can crash GPL if it is over 50;  an ideal depth for a 100 polygon object is about 10-15.  Split polygons being created are a sign that ase23do is having trouble dividing your object into pieces, but they are inevitable.  You should only worry if they go over about 25% - e.g. a 100 polygon object becomes 125.  Even that isn't much to worry about, but 1000 becoming 1500 is cause for concern.


Polygon placement and Intersecting polygons

By designing your object properly, you will prevent it being turned into mush by ase23do.  

Single object only


When you have finished designing your object and are ready to export it, do the following:
Doing this helps ase23do greatly :)


Collision Volumes

**This only applies to ase23doc2**


If you wish your object to be crashable, you must add collision volume(s) to it.   With 123do this is quite easy, but if you are using 3DStudioMax, you must add them manually.  Muahahaha.


Export your object to .ase

Open up the .ase file using WordPad or your favourite text editor (not a program that will add formatting.  Keep it plain text).

Right at the end of the file, you will be adding some lines.  The first line is

*COLLISION_VOLUMES n

where
n is replaced with the number of volumes that follow.
Each volume consists of a number of planes (think of them as polygons) that define a closed region.  If you are creating a hay-bale, your planes will match up with all 5 visible sides (no need to define the bottom, unless you will be driving underneath the bale).

The next line is needed for each volume:

*COLLISION_PLANES n

again,
n is replaced with the number of planes that follow.
For each plane:


*COLLISION_PLANE type a b c d

type is the easy number - I normally use 3, which creates a hard surface.  There are many different surfaces, most of the useful ones are between 1 and 20.  If somebody has a list of these please send it !!!

Now for the complicated business

a,b,c define a unit vector which points out perpendicular to the plane (polygon).  A real world example would be a nice straight tree that is 1metre tall (the unit vector) on a flat piece of ground (the plane/polygon).

d is the distance from the origin (0,0,0) to the base of the unit vector.  

I recommend reading 3dos for dummies where the equations for working out all these numbers are detailed.

Or you could just use 123do for all your collision creating :)